The Breathing Technique We Should All Know and Use.
E for E is the breathing technique we should all know and use throughout our day.
Using it can calm and rebalance the nervous system and protect and stabilize our spine. It prepares moms-to-be for labor and delivery, alleviates upper and lower back pain, strengthens our pelvic floor, helps us maintain our balance as we age, improves our mood, sleep, digestion, and so much more.
E for E Breathing Technique achieves all this because it strengthens our body’s #1 Spine-stabilizing muscle called the diaphragm.
The functions of the diaphragm do not stop locally in its anatomy but affect the whole body system.
(5)(italics and underline added)
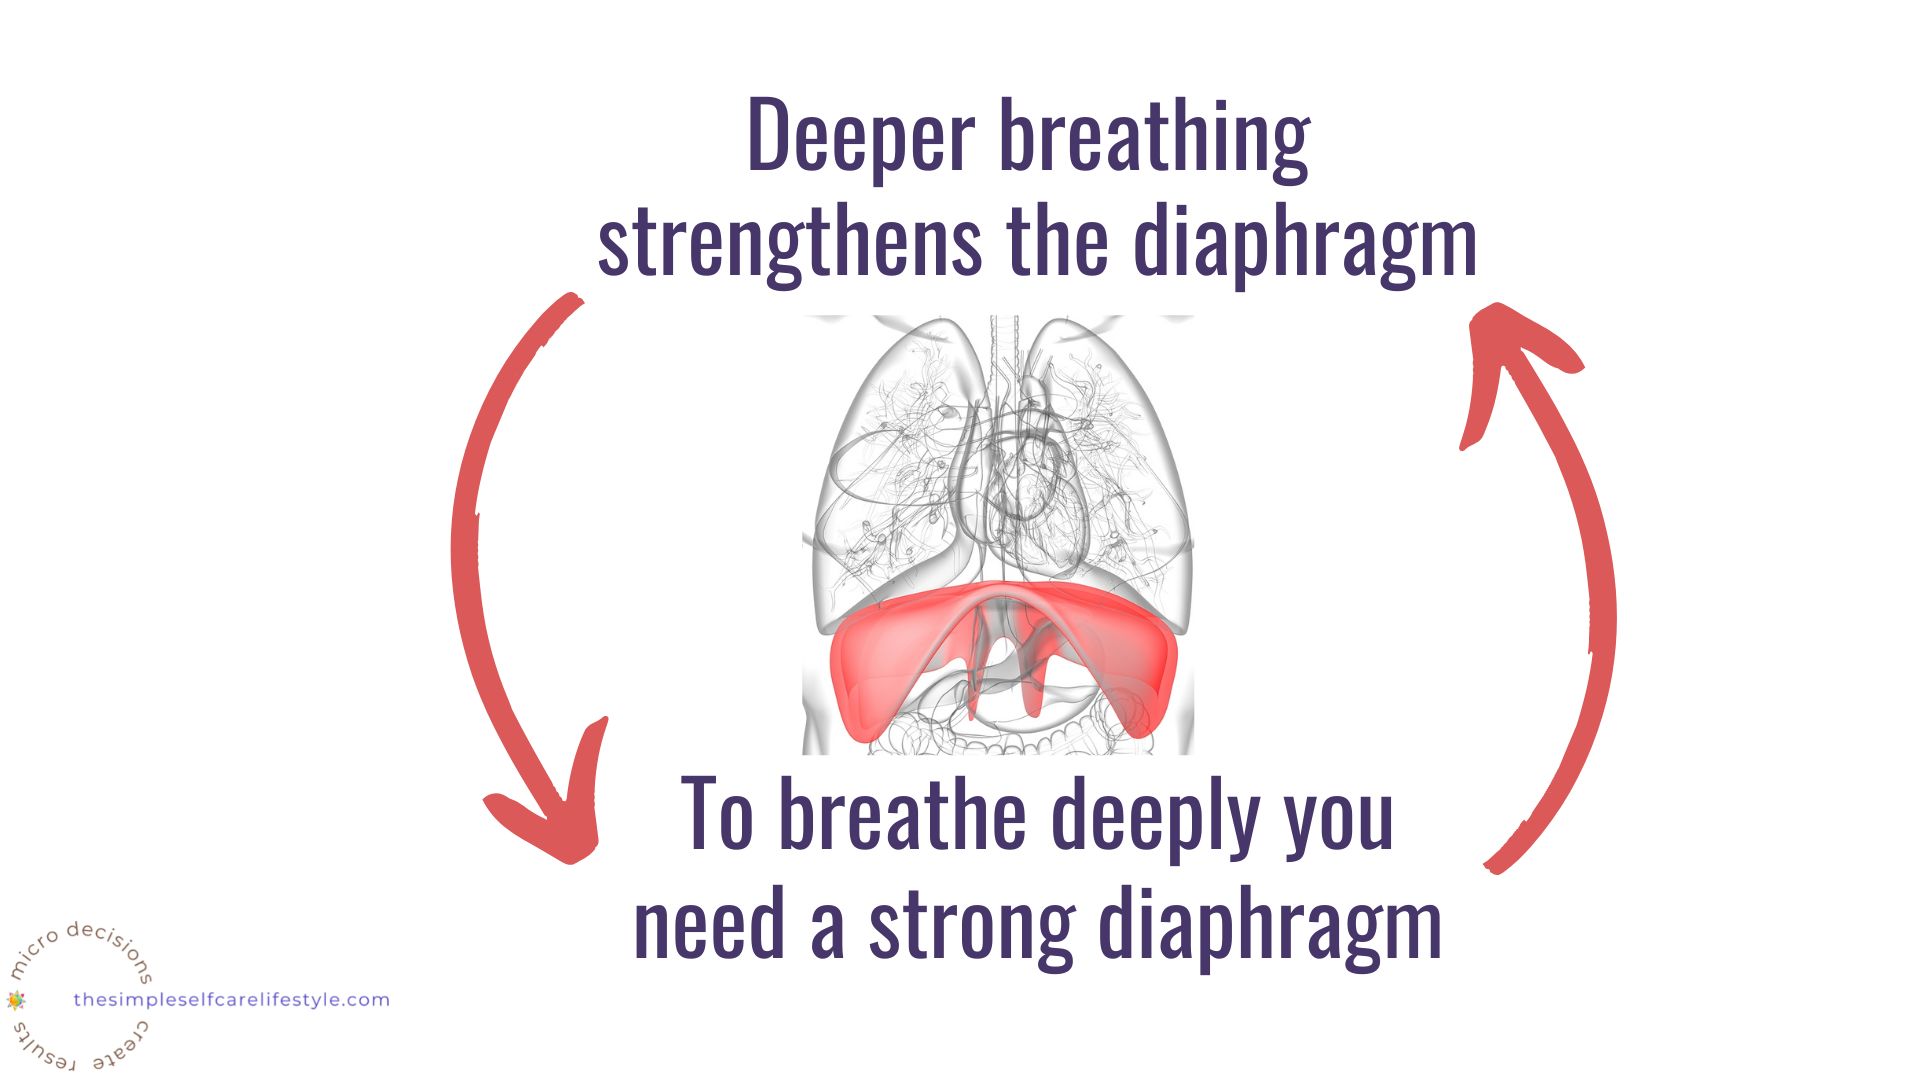
A Strong Diaphragm = Better Posture = More Strength = Better Breathing…..
A strong diaphragm helps us breathe deeply. As we strengthen our Diaphragm, breathing capacity is only one benefit. Everything about our body improves!
Deeper breathing promotes multiple positive physiological cascades in our body like:
- Reducing anxiety,
- Improving our mood,
- Decreasing stress hormones
- Improves Sleep
- Brain Function…,
- This is a tiny partial list of what is positively impacted.
Add the fact that the stronger our Diaphragm, the calmer our Nervous System can be, and you’ve exponentially added to the list of benefits!

A Stronger Diaphragm and Calmer Nervous System offer benefits like:
- Reduction of Upper and Lower Back Pain
- Increased ability to work out.
- Stronger abdominal muscles
- Reduced aches, pains, and NECK HUMPS!
- Stronger pelvic floor muscles,
- Ability to lift more weight safely.
- Reduction of Incontinence, ED,
- Prolapsed Uterus, Bladder..
- Prepares pregnant women for a better delivery experience,
- Help Ab separation (Rectus Diastis)
- Reduces tingling and numbness in shoulders, arms, and hands from compression
- Bowel movements improve
- Lymphatic movement is more effective
- Asthma, and COPD can benefit
- Endurance increases
- Lower blood pressure…
Here is how to do E for E Breathing Technique to Reap All The Benefits of a Strong Diaphragm:
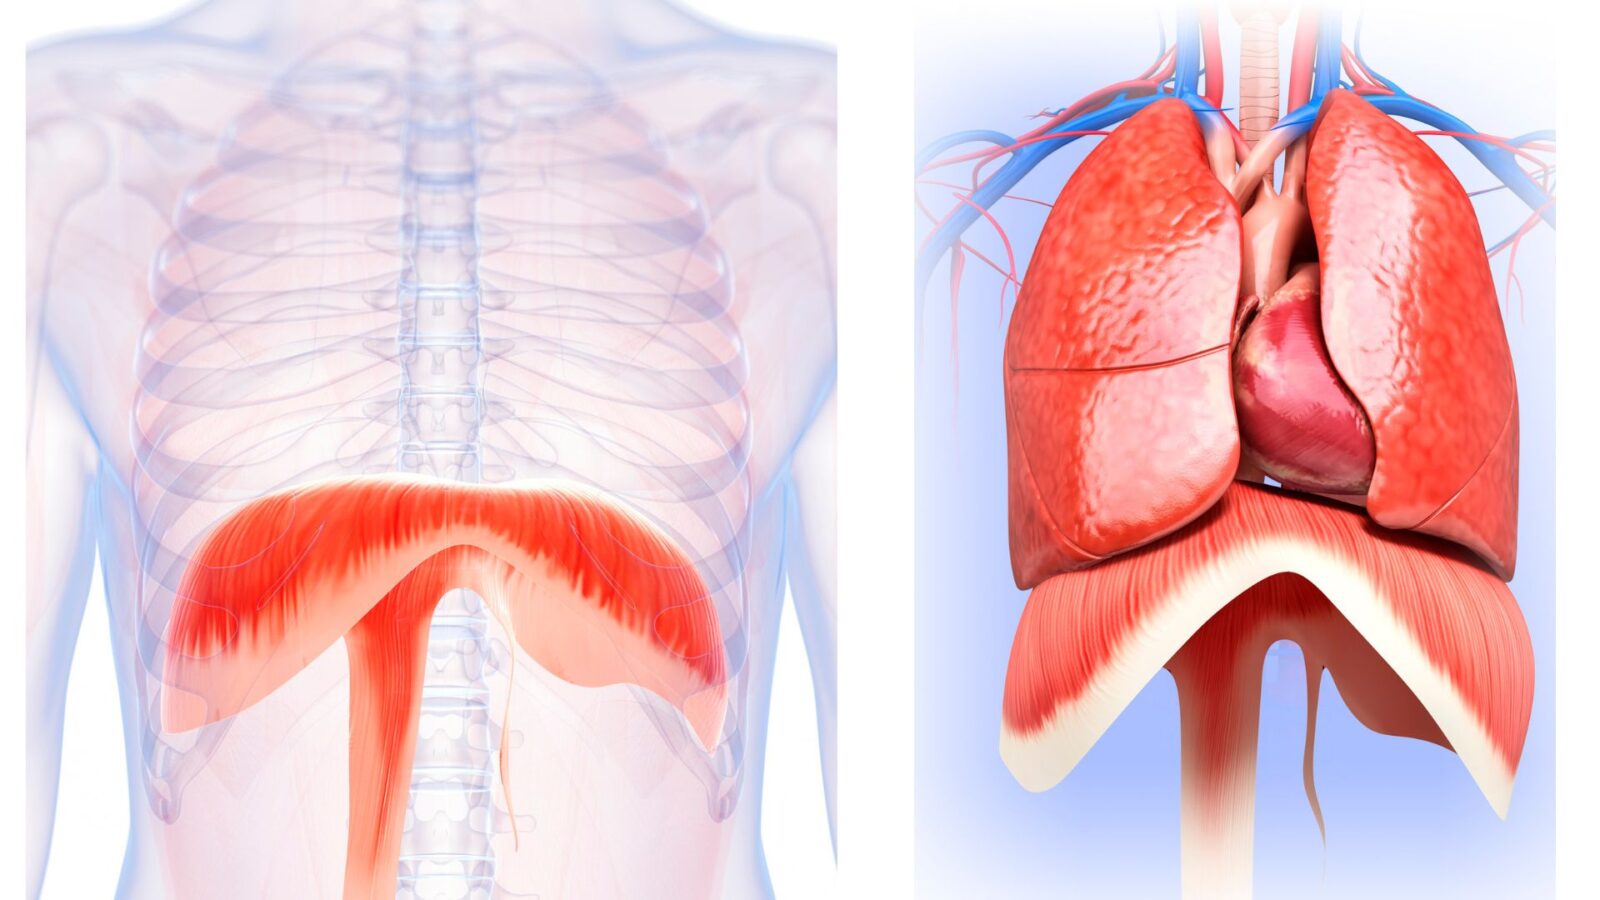
Locating the Diaphragm, the Muscle we are Training with E for E
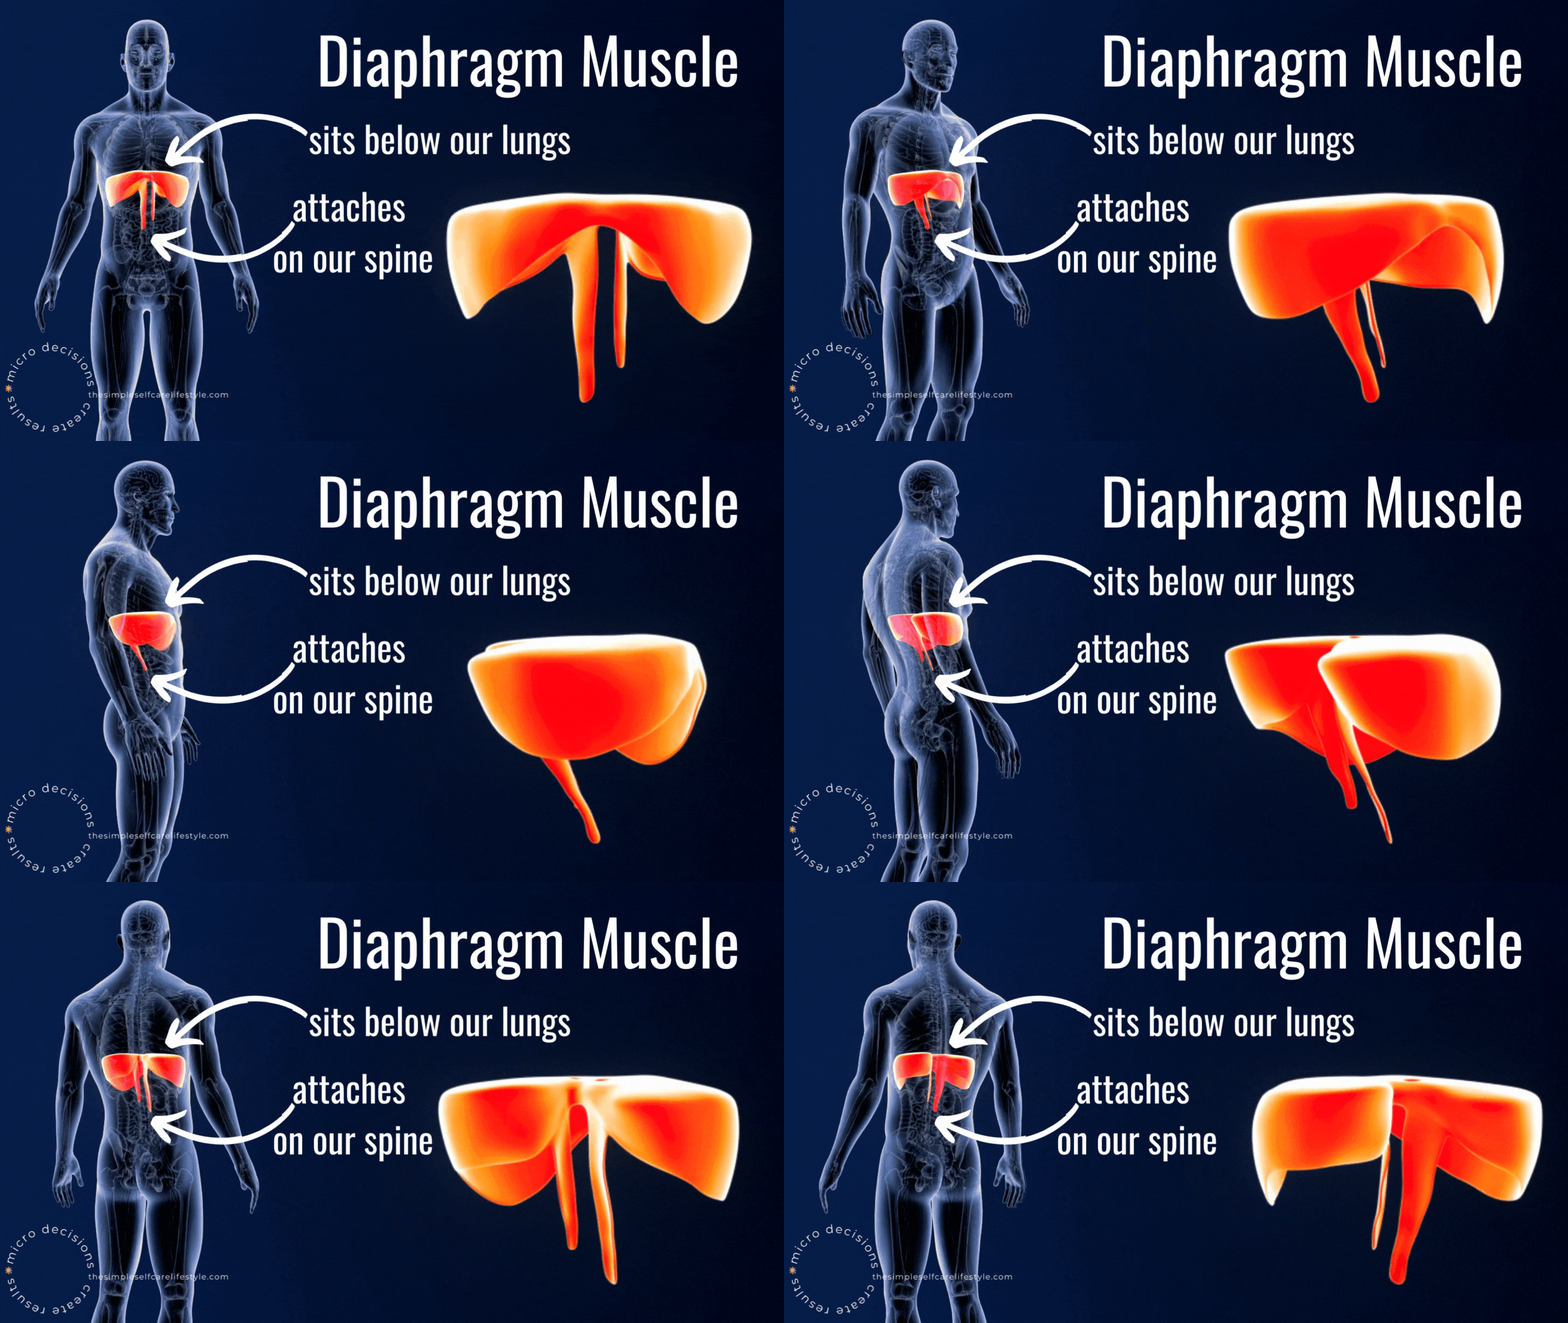
- The Diaphragm sits under our Lungs.
- Attaches to the front of our ribcage
- As well as the sides of our two bottom ribs
- The illustration below shows that it also attaches to three of your lower spine vertebrae via a central tendon.
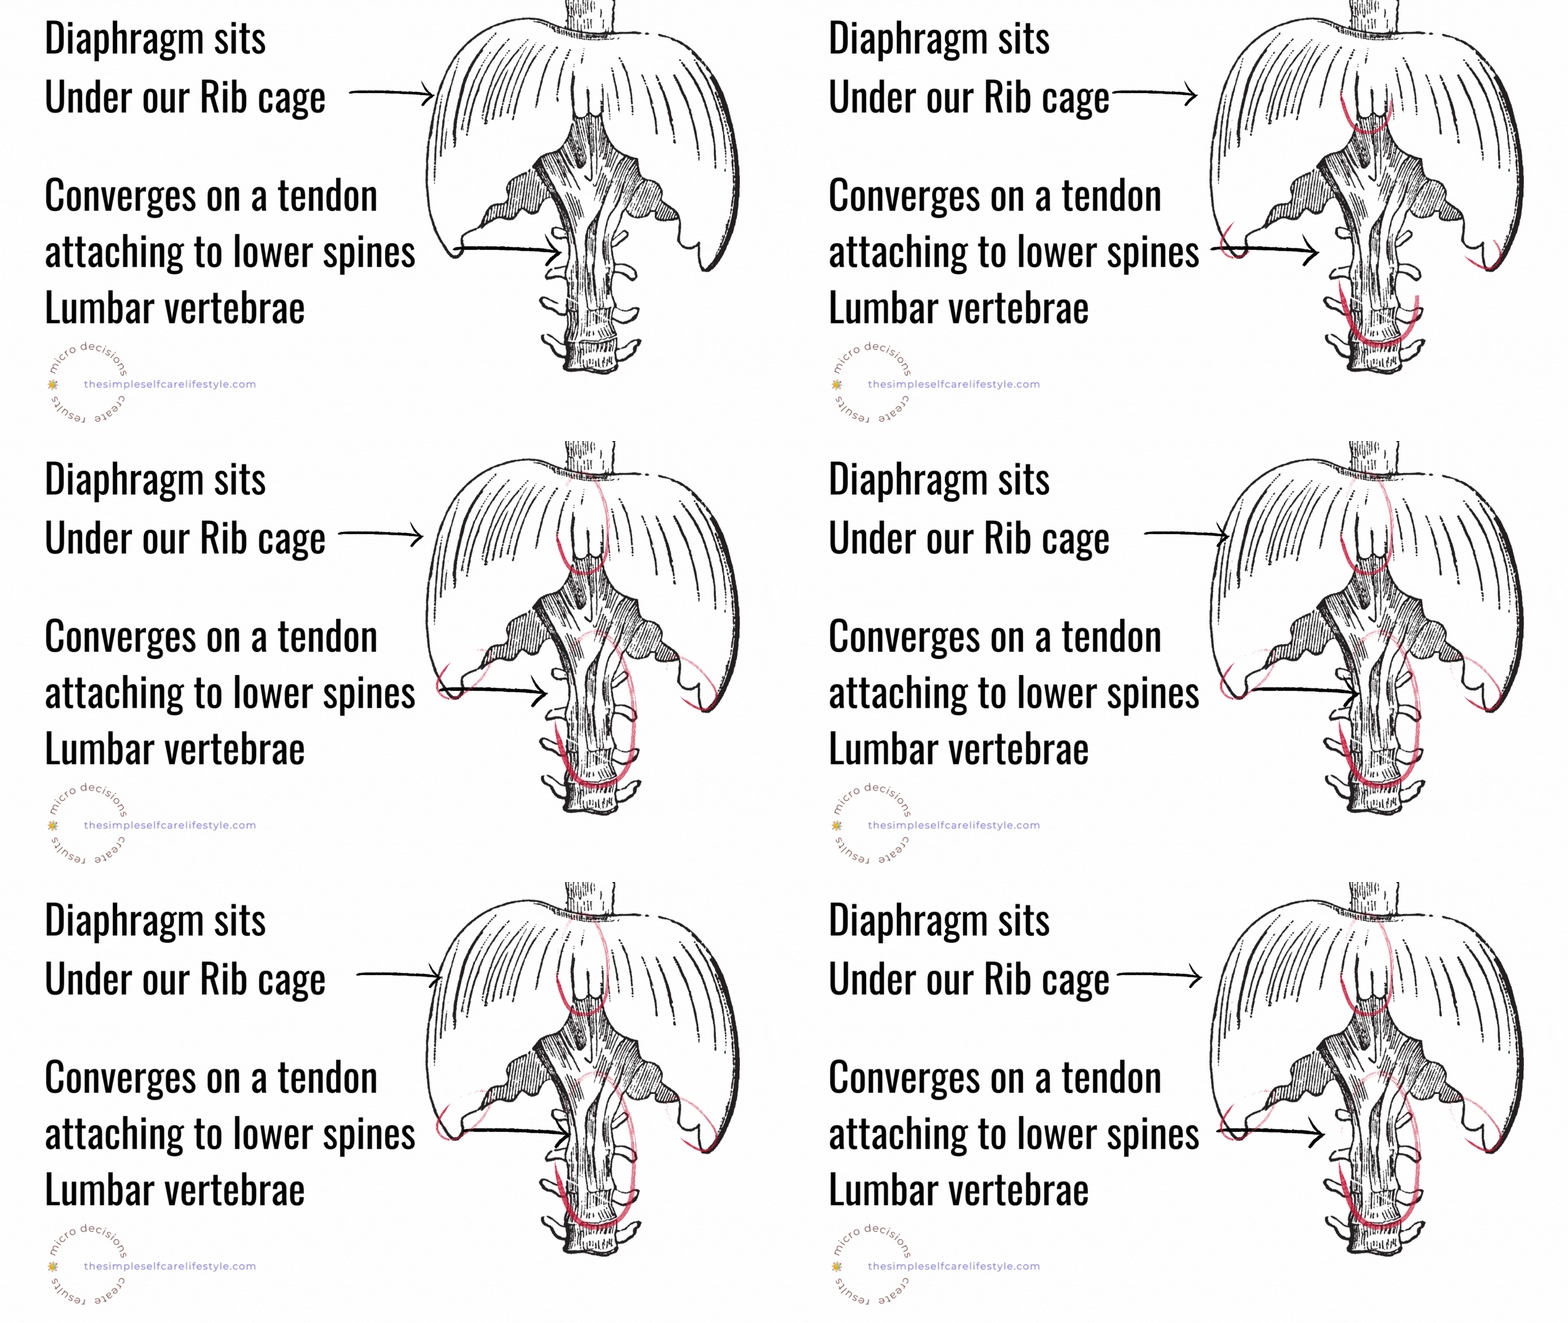
It is concluded that the diaphragm consists of two muscles that act differently on the rib cage
(1)
The Diaphragm Sits under your lungs.

Training-Diaphragm Breathing Technique: E for E
We are going to go through the E for E diaphragm training breathing technique that strengthens the diaphragm with EACH breath.
After you learn the E for E technique in this post, there is more detail on HOW it can work for Incontinence, ED, Backaches, and Pain OR if you are pregnant and want to know how the technique combined with positioning is the best pelvic floor exercise, visit these posts next.
If you are pregnant, this post is the one to check out.
Now, Let’s Learn and Practice E for E.
I’ve created two pictures.
1. Shows how we typically use the diaphragm when we Exhale during exercise (or when we lift objects).
2. Is how we want to use our diaphragm for all the benefits strengthening it has to offer.
1. We Typically Breathe Like This When we Exert Ourselves
When we exert effort and exhale deeply, we tend to pitch our upper body slightly forward.
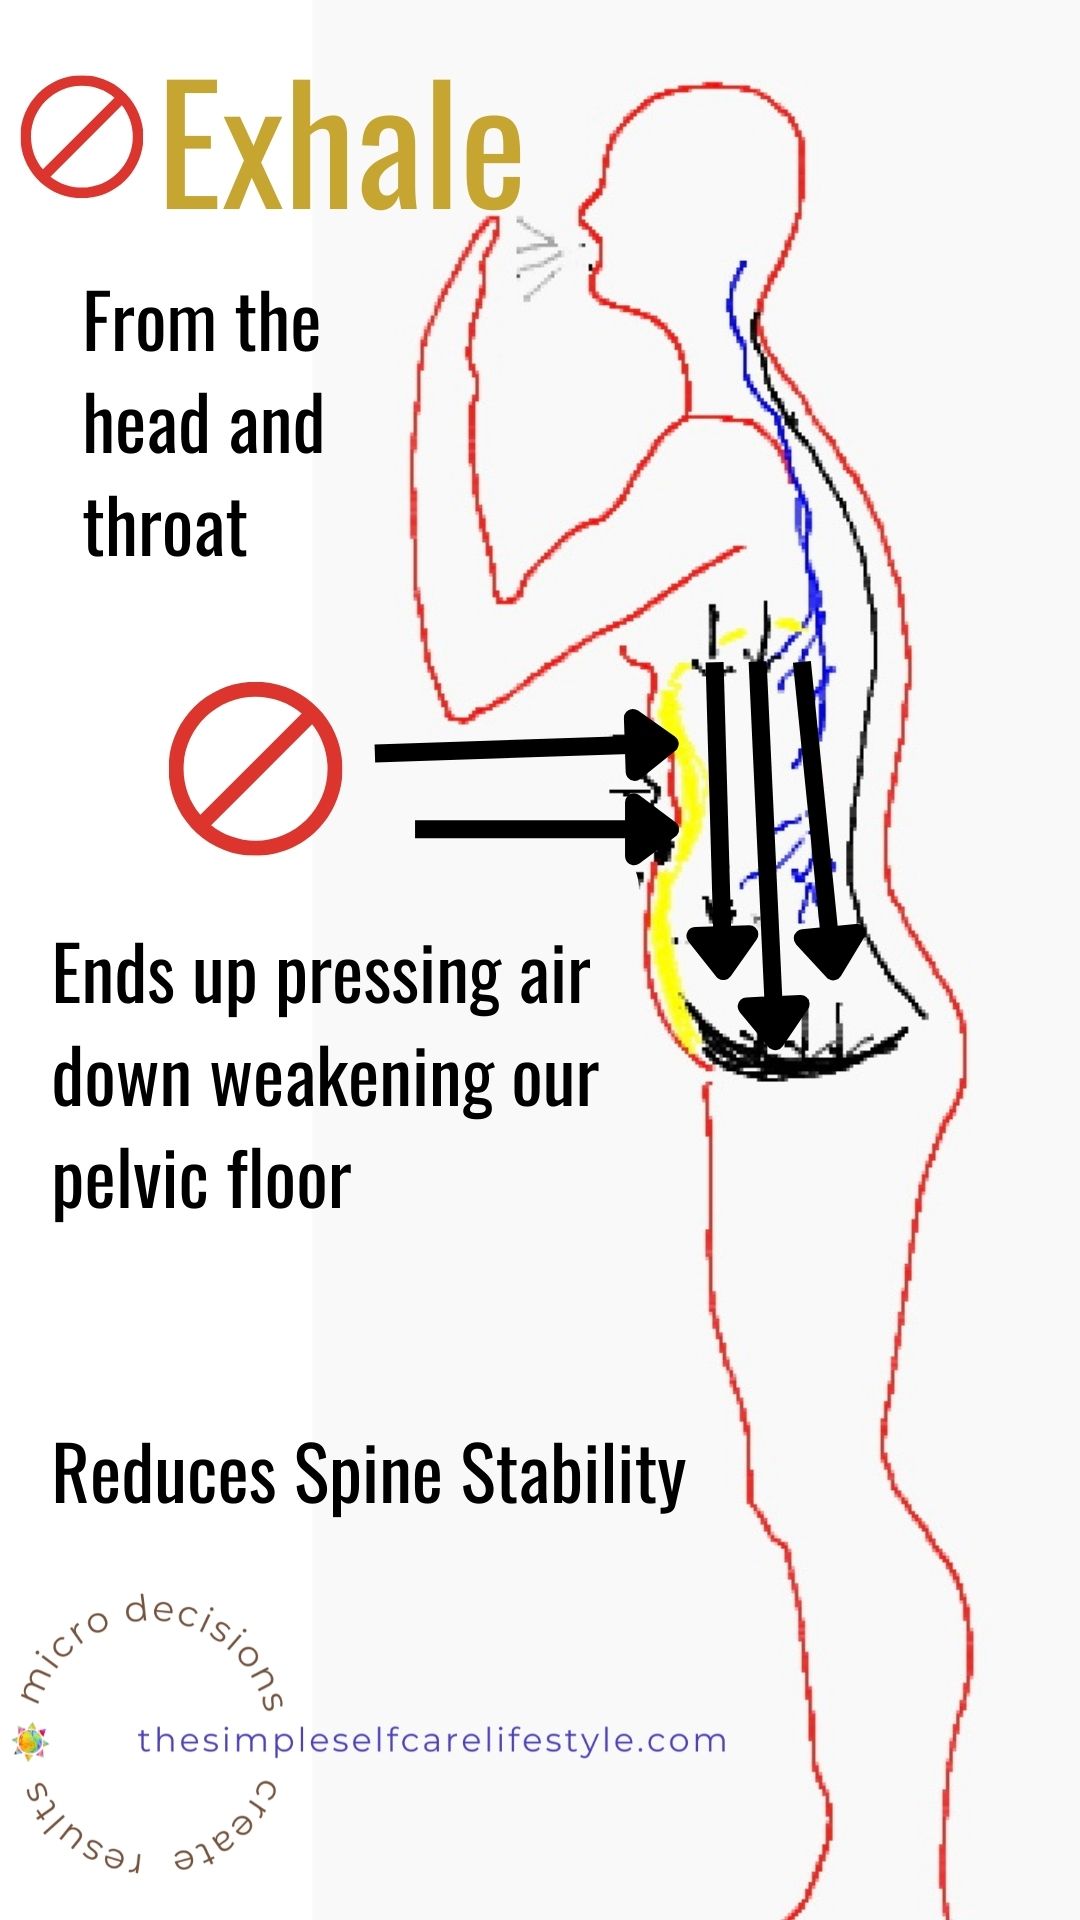
We contract most of our upper and middle stomach muscles, pushing the air out of our mouth.
The sound of the air coming out is more of a blowing.
The arrows show that this type of breathing creates a downward pressure inside the abdomen when we exhale this way.
This downward pressure pushes on the pelvic floor muscles.
The more the pelvic floor muscles are pressed downward, the more the abdominal cavity loses spine stability.
A weak diaphragm and weak pelvic floor muscles contribute to posture problems.
NOW, how we want to EXHALE while exercising or exerting effort so that we are Training our Diaphragm Muscle to be Stronger.
Optimally, We Would Like To Do This
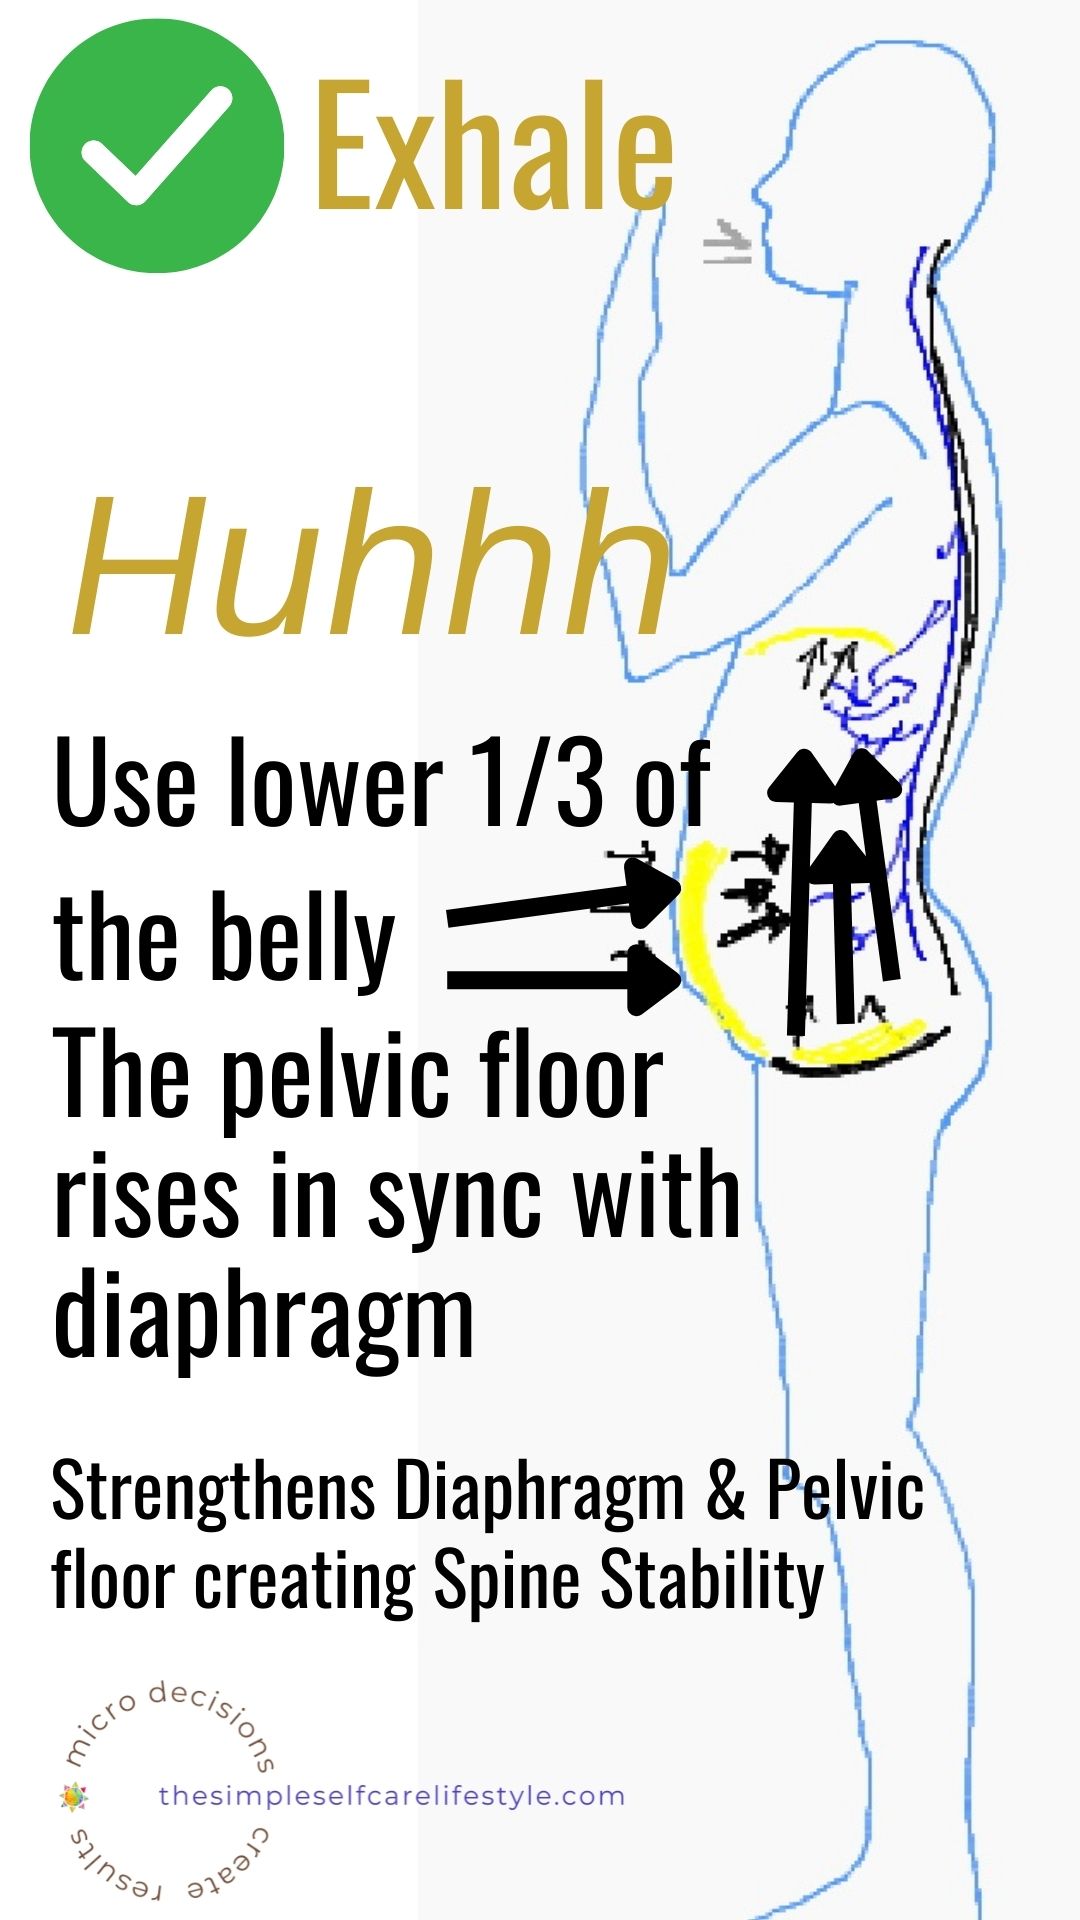
Exhale instructions:
Maintain an upright upper body posture.
Whether standing, sitting, or lying down, we want to use the lower third of our abdomen to PRESS the air in our abdominal cavity up and out through our open mouth.
The lower third of your AB muscles is the section from below your belly button down to your pelvic bone.
When you use the lower third of your abdominal muscles to exhale completely, your pelvic floor muscles will rise because they are meant to work together with your diaphragm.
The stronger the diaphragm, the more completely your lungs will empty. The sound of the air coming out of your open mouth is a huhhhhing sound.
Get in the Practice of Using the Lower Third of Your Abs and Exhaling:
- during the effort part of your exercises
- when preparing to lift something heavy
- it’s even great to use when getting up and down from a chair
Each time we use E for E, we strengthen the diaphragm and pelvic floor.
The strengthened diaphragm and pelvic floor create:
- A stable spine.
Having a stable spine promotes:
- Good posture.
The Better our posture, the better everything else works biomechanically and physiologically.
Let’s Find The Lower Third of Your ABS
The technique I’ve found the most useful in helping clients find the lower third of their abdomen is to imagine you’re trying to blow up a balloon.

If you were blowing up a balloon, you probably can imagine you’d press the lower 1/3 of your abs to make the balloon go up.
We typically use our lower abs when blowing a balloon because we really won’t get far if we are just blowing some air from our lungs.
As you blow up a balloon, you typically inhale through your nose so you do not lose the air already in the balloon.
Then as we attempt to get more air into the balloon, we push from our lower belly.
That is the region of the muscle to use with each exhale. It is the lower 1/3 of your ABS.
When you press the air UPWARD in your abdominal cavity (see E for E post to see how it all works)
The air presses on your diaphragm, which helps place upward pressure on your lungs.
Video Train 1 Muscle FIRST (Diaphragm)
At 02:19 I walk through how we typically use our diaphragm and how we want to use it. Plus we practice finding the muscle that helps us strengthen our diaphragm…

This technique will train your diaphragm.
- Inhale through the nose.
- Mouth relaxed and slightly open so the air can come out.
- Press the Lower 1/3 of your ABs slowly and completely so the air in your abdominal cavity presses up and out of your open mouth.
That’s it! Simple but often not easy until you practice. Repeat, repeat, repeat.
If you haven’t blown up a balloon, think about how you would blow out a candle far away or blow a bubble using a bubble wand that is positioned farther away from you.
Each of these can help find the lower third of your ab.
Once you’ve found your lower ab muscle, practice it a few times right before beginning any exercise.
Over time, this spine-stabilizing exhale action will become second nature
In the meantime, there are ample times throughout our day when we can strengthen our diaphragm by taking advantage of this exhale technique:
- when you pick up a child
- carry a laundry basket
- lifting groceries in and out of the cart or car
- getting in and out of the car yourself
- vacuuming
- moving from a seated to a standing position
- exercises
- standing up from a squatted position
- any time you lift something
Each time by simply using the lower third of your abs to press the air up and out, you will be strengthening your diaphragm.
The stronger your diaphragm, the better your body is set up to function
…studies concluded the effects of deep abdominal muscle strengthening exercises on respiratory function and lumbar stability. The finding is that core stabilization starts with the proper function and activation of the diaphragm.
The diaphragm…plays a role in respiration and trunk stability by controlling intra-abdominal pressure and reducing the stress on the spine through cooperative action with the abdomen and the pelvic floor muscles.

E for E Breathing: The 2.5-Minute Chair Routine
Link 🔗 Posture Chair Routines Work up from 2 1/2 minutes to the Full 20-minute Routine.
This 2.5-minute routine trains your diaphragm muscle and simultaneously uses the Spine’s Deep Muscles (Focus 2 and 3 muscles– instructional video in Post 1).
The 2.5-minute diaphragm training and deep spinal muscle exercises will improve your neck hump PLUS
It’ll:
- Improve the spacing between the vertebrae so your nerves are not being pinched.
- Recalibrate your vagal tone (balancing your HPA Axis)
- Then your balanced HPA Axis will help balance your hormones.
- Balanced Hormones improve sleep, cravings, mood, and anxiety….
- Better sleep, mood, and fewer cravings will give you higher energy and interest in exercise.
- Motivation increases to layer on longer versions becomes exciting. There is a 5-minute, 15-minute, and 20-minute version.
- Then when you are ready. Are doing the 20-minute chair routine regularly for a month, you will be ready to take on the next Fix Your Neck Hump/Posture exercises. Another FREE Program I have for you: The 90 days 5 Simple Exercises.
The 5.5-min Neck Hump Routine: Adding Rhomboid
There is a 15 Min and a Full 20 minute Routine along with tracking sheets and access to the Head to Toe Form on the Video Topics Page.
It is all in the Video Topics Page for you!
Everything You Need is right here on The Simple Self Care Lifestyle. Use the VIDEO TOPICS page for quick and easy access to the videos by topic

3. 90 ☀️Days 🖐🏼5 Simple Exercises
Continued Support. Improve posture and spinal stability. The 90 Days 5 Simple Exercises Series.
The 90 Days 5 Simple Exercises Series will build on the foundation you create:
- toning your superficial muscles. (the ones everyone typically focuses on first, like abs, butt, thighs,…)
- Helping your neck hump fade further as your body rebalances.
90 Days 5 Simple Exercises
I’m ready to start!
READY to slip the 2 1/2 Min Into Your Daily Routine!
Fixing your Neck Hump starts with laying down the foundation of strengthening your diaphragm muscle FIRST.
I’ve gone into detail, describing the extra benefits training your diaphragm muscle FIRST can provide you when you want to FIX your Neck Hump!
Give the 2.5-minute routine a go each day and see how you feel. I’ve added the video again at the bottom for easy repeat access AND I also placed it with the incrementally advancing routine here on the Video Topics Page: Category POSTURE ROUTINES SEATED.
Tracking Your Progress is Motivational.
Begin with the Head to Toe Form with downloadable measurement sheets. It prompts you to go head to toe, noting how your body feels today. You hit submit and it is instantaneously in your inbox (or at least within a few minutes). This makes tracking your progress easy.
-Get on the list for the MOtivator APP. Another Free Tool for You – from me.
(Read about it here on the 🔗 Micro Decisions Page)

The Simple Self Care Lifestyle
MOtivator APP
– Grab a friend or 2 to join you. If they subscribe today, you will all be on the same page!
Get updates from
The Simple Self Care Lifestyle
I’m excited to hear from you as you experience the results strengthening your diaphragm provides! Be sure to share your progress HERE.


2 1/2 Minute Routine For You to Try Now…
(For Step-by-Step Instruction on Positioning and Exercises in this video, see: Dowager’s Hump post)

When we know how to leverage the way our body is set up to work, we can work with our bodies, gaining results in the least amount of time.
Choosing the most effective, efficient exercises means we can fit self care into our busy lifestyles.
Videos for easy daily access can be found here from today’s new diaphragm training.
As always, you can email me here: [email protected]
Have results you’d like to share! HERE
Today’s References and resources are at the bottom of the page for you.
The Simple Self Care Lifestyle
THe simple self care lifestyle
Simplify
self care
Post categories



SHOP Products
Personal Products
Healthy Home
Quality Supplements
Things to Keep Handy
Quality Food Sources
Simple Self Care Programs
References & Resources for you
Additional linked resources for you for a deeper look into Neck Humps:
Additional linked resources for you for a deeper look into Neck Humps:
Additional linked resources for you for a deeper look into Neck Humps:
Additional linked resources for you for a deeper look into Neck Humps:
Additional linked resources for you for a deeper look into Neck Humps:
Additional linked resources for you for a deeper look into Neck Humps:
Additional linked resources for you for a deeper look into Neck Humps:
Additional linked resources for you for a deeper look into Neck Humps:
“Alteration of head and neck positions can have an immediate negative impact on respiratory function.”


